For those of you who don't already know I stood at the wrong end of my temperamental mare last Sunday (6 Oct) and was kicked. The kick itself bruised me but the landing broke my left upper arm and bruised most of my back.
Well, the short version is the horses arrived where they are supposed to be and are doing fine but I'm still stuck here due to disorganisation that may not have occurred if the ex had let me move out by the end of October, which is what I was aiming for, instead of trying to rush me out earlier and putting extra stress on me.
At the moment I'm broken, tired, sore, drugged to the eyeballs and bored shitless as I can't do much.
I'm also looking at another 10-12 weeks of this....with no craft of any kind that I can do, most of my books packed and difficulty even dressing myself or making a cup of tea I'm going to be climbing the walls before long.
Soooo, that's my pity party for now. Hopefully after the permanent cast replaces this temporary one, sometime next week, the prospects of amusing myself may improve.
At least I'll have company after I move as I'll have the smaller animals around - my dog , cat and the cockatiels.
Cheers,
Robyn xo
18 Aug 2013
Neglected Blogging
I was just flitting around catching
up on some blogs yesterday and today and I realised that I've been neglecting
my blog followers as I've been spending more time than I should on facebook and
also posting pics on facebook instead of here.
My new
resolution is to post here FIRST from now on and link to fb as I can do that
and just link relevant posts to fb, not the whole blog. It's wonderful how much
freedom you can have with the internet if you just do some research on the
privacy settings.....and have family or friends check to make sure you've set
them properly! I'm not an IT whiz but I do my best :).
So here's a
roundup of photos I've taken since my last blog post as photos say more than
words can. I won't do captions as the photos themselves will give viewers their
own thoughts/feelings about what they see.......and it's Sunday and I'm feeling
too relaxed to do the "journalist" thing today. They are roughly in
date order from 6 August to yesterday (17Aug).
ENJOY!!


Small
comment on the horse and rider - she broke this thoroughbred in herself - it
has taken her a few months as she is her Dad's apprentice. He was given to her
as a registered yearling that the owner did not want to keep, he's just turned
5, and she's done a magnificent job making him into a quiet riding horse. Her
next job - making him a stock horse.
Cheers,
Robyn xo
6 Aug 2013
Hot process crockpot soap making
Last week I rendered my first lot of beef fat into tallow. I did it on the wood stove and, as it was fat from the beast we had just slaughtered, it cost me nothing but my time. About 4kg of fat became around 1400ml of tallow or approximately 1000g. The trimmings and leftovers became part of the next 3 feeds for 8 hungry 6 week old puppies :). I strained the tallow through cloth but I didn't need to skim it or clean it in any other way. I'll be doing this again as it's quite easy. I've also discovered grass fed tallow starts out yellow and turns a creamy colour unlike the white lard in the stores!


Combining the melted ingredients. I then poured in the lye/water mix slowly while stirring gently but I was unable to take a photo at the same time.


I think I'll need to cook them on a higher heat next time as it took quite along time on low. It will be interesting to see how long it takes for these to harden compared to cold process. From what I've read they should have been useable as soon as they are cut but I think the elevation here coupled with the soft rainwater used may have some effect on the hardness of the soaps.
Another three challenges to cross off my to-do list - rendering fat, making soap using tallow and making hot process soap :D.
I'm on a roll!
Thanks for dropping by,
Robyn xo

I've been wanting to try soap made with tallow for a while as it's supposed to be harder than that made with vegetable or olive oils. I've also been wanting to try hot process soapmaking so the soap can be, theoretically, used sooner.
The recipe I used is:
Copha
250g
Rice Bran Oil
400g
Beef Tallow
350g
Water
380ml(g)
Lye(in the plastic container) 142g
Lemon Myrtle essential oil 12
drops

and I prepared it mostly like I would if I was making cold pressed soap with the only difference being the cooking at the end of the process.
Melting the oil/copha/tallow


After using a stick blender to achieve heavy trace

Halfway to cooked

Almost there

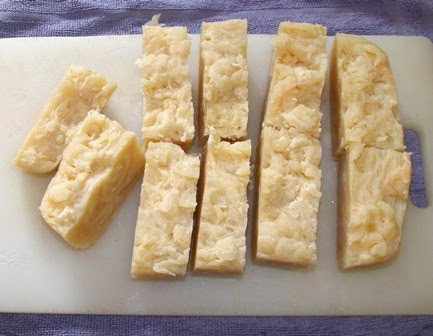
Next morning - the soap set in the mold

Bottoms up to cut

Finished blocks of soap averaging 136g each. They are still a bit spongy so will need some time to dry out and will lose a little weight in the process.

I think I'll need to cook them on a higher heat next time as it took quite along time on low. It will be interesting to see how long it takes for these to harden compared to cold process. From what I've read they should have been useable as soon as they are cut but I think the elevation here coupled with the soft rainwater used may have some effect on the hardness of the soaps.
Another three challenges to cross off my to-do list - rendering fat, making soap using tallow and making hot process soap :D.
I'm on a roll!
Thanks for dropping by,
Robyn xo
28 Jul 2013
Home Made Sausage Rolls
I've had this recipe for a few months and I finally tried it.
 250g sausage meat
However, I'm a bugger for changing things around to make them more healthy, and doubling recipes so I'm not forever cooking, so I added a few veges, popped in a half a cup of finely ground oatmeal to compensate, mixed all the ingredients together and made them regular sausage roll size.
The filling turned out a little soft, even though I let it cook for a bit longer so maybe I should have added more oatmeal but possibly it was the sausage mince was too fatty.
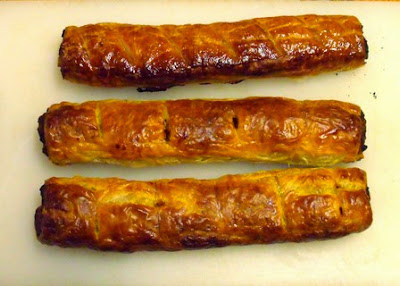
Ah well, they taste nice and one half of the mix is curried so there's a bit more variety :)! Shame the poor light doesn't make them look as good as they taste.
Cheers, Rob xo.
Beef and sausage roll
Few people can resist the lure of crispy pastry! Add the savoury
succulence of a herby sausage filling and you are onto a winner with the
family. Sausage meat can be fatty and all meat is expensive. This super
stretcher recipe combines lean beef mince with the sausage meat for a healthier
option and stretches 500g of meat into 8-10 serves.
Preheat the oven to 220°. Prepare the pastry by brushing a little water
along one edge. Overlap the wet edge with the second sheet of pastry and press
firmly (I roll over the join a few times with the rolling pin). If using block
or home-made pastry roll it out to roughly 50cm long and 24cm wide.
Chop the onion and combine with the sausage meat, beef mince and herbs,
this can be done in a food processor. Slice the cooked potatoes into ½ cm
slices. Combine the chutney and tomato sauce.
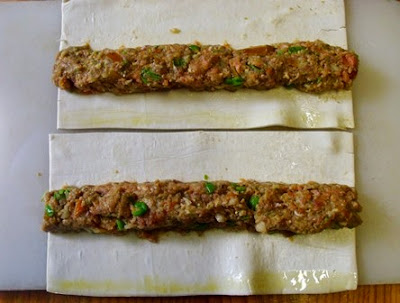
Brush a little water down one long side of the pastry. Spread the sauce
mixture over the pastry not quite to the edges. Form the meat mixture into a
sausage shape down the middle of the pastry, flattening it slightly so it is
compact. Place the potato slices on top of the sausage and carefully wrap the
pastry around the filling. Stretch the pastry a little if you need to, to
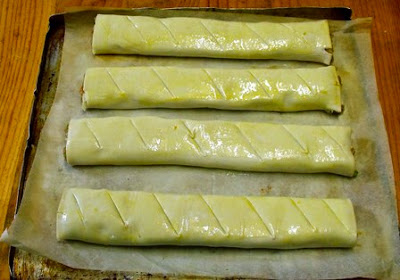
accommodate the filling. When you have joined the pastry along the length of
the roll as best you can (don't worry if it's not perfect) carefully lift
(using a long spatula) or slide the roll onto a greased baking tray, you may
need to place it diagonally. Beat the egg lightly and brush over the pastry,
then use a serrated knife such as a bread knife to cut slashes into the pastry
top at 1 ½ - 2cm intervals. Bake in the preheated oven for 25-35 minutes or
until pastry is a rich golden brown. Slice and serve hot or cold with
vegetables or salad.
Cook's tips:
We get at least 8 adult serves (2 slices per person) from this when we
serve it with side dishes. If you are feeding little people you'll get even
more. If you don't want to waste an egg on 'glazing' the pastry, just brush it
with milk.
***************************************************************************************
However, I'm a bugger for changing things around to make them more healthy, and doubling recipes so I'm not forever cooking, so I added a few veges, popped in a half a cup of finely ground oatmeal to compensate, mixed all the ingredients together and made them regular sausage roll size.


The filling turned out a little soft, even though I let it cook for a bit longer so maybe I should have added more oatmeal but possibly it was the sausage mince was too fatty.

Cheers, Rob xo.
27 Jul 2013
My First Tutorial - A Denim Tote
I'm a moderator on the DTE forums and as part of the Skills Challenge 2013 I volunteered to do a sewing thread on Reusing/Recycling/Remaking clothing. Thinking a bag was a handy thing to have, and a denim tote bag would be doing the 3R's on an unwearable pair of jeans, I scoured the net for a written tutorial on the type of bag I wanted to showcase and the tute also had to be beginner friendly.
No such luck unless it was a video. Now what beginner with not a lot of machine sewing experience wants to try and watch a video, some of which assumed the viewer knew sewing terms and a lot of basic skills, and sew something they've never made before at the same time? Add to that I have satellite internet and know quite a few others who share this "affliction" so 10 minute plus videos that don't have all the steps clearly layed out are a waste of precious expensive download.
That left me with one course of action - make my own tutorial.
So here it is for those of you who aren't already members of the DTE forums.
A Simple Denim Jeans Tote Bag
Basic Requirements
An old pair of jeans – whatever size you want your bag
An old fabric belt
Quick unpick – also known as seam ripper....just in case!
Scissors or rotary cutter and cutting board
Pins and pin cushion
Ruler, tape measure or sewing/quilting rulers /squares
Pencil or marking chalk
Sewing machine
Thread for machine.
Machine needles for denim size 90/14 or 100/16 depending how thick/heavy the denim is.
Iron – this can be made without the use of an iron but I find it easier to do so and a place to iron (ironing board, blanketed table etc)
Note: All side seams and hems are 1/2'” wide and I backstitch at beginning and end of each row of stitching to secure it.
.jpg)
Here we go!
Hoping you’ve already set up your machine to sew denim re stitch length etc .
First cut the jeans. You choose how big you want the bag to be but keep in mind that this will be a bag with boxed corners so allow extra for that. Mine are 18” square fabric pieces which will make a bag around 15”x 15” x 3” deep. I used size 16 (Australian measurement) ladies jeans . Cut one bottom section out of each jeans leg, leaving the inside leg seam intact. The thick outside seams are removed as they will be difficult to sew over. I unpicked the hand sewn leg hem as I needed that inch or so to do my new top seam.
.jpg)
.jpg)
.jpg)
.jpg)
Place the pieces right sides together and square them up, or you can make your own “ruler” from a big cereal box and use it.
.jpg)
.jpg)
.jpg)
.jpg)
.jpg)
Next is to press or fold down ½” doubled hems on this top edge of your bag. This is why I use the iron with denim or other heavy fabrics as it gives a better edge to sew along. Pin your hems and stitch close to the bottom edge, making sure you remove the pins before sewing over them or you could break your needle and damage your machine.
.jpg)
.jpg)
.jpg)
Now place the outsides of your bag facing each other, pin them together, then sew. I like to sew each side from top to bottom first, then sew the bottom seam together. I find there’s less fabric movement that way than going down one side across the bottom and up the other side. As the denim tends to fray you may want to stabilise it by overlocking (serging), using zig-zag or edging stitch like I did, or clipping with pinking shears if you own a pair. I also clip the corners on a diagonal before the stabilising stitch to make the corners neater when they are turned right way out.
.jpg)
.jpg)
To ensure your bottom thread doesn’t become tangled underneath turn the wheel on the side of your machine to take a stitch and when the needle returns pull the bobbin thread through the material to the top, just as you’d do if you’d just rethreaded the machine. This means both threads are now on top and you can hold them when you begin stitching.
.jpg)
Inside of box bottom
.jpg)
Outside of box bottom


Sew the handles on by stitching a square to secure them firmly. If you’re not familiar with this what you do is stitch almost to the edge of the handle, parallel to the hem, stop the machine with the needle still lowered in the fabric, raise the presser foot, turn the bag until it is in position to sew down the side of the handle, lower the presser foot and repeat.
.jpg)
.jpg)
Hope everyone has fun trying this!
Feel free to link or copy for your own use but don't claim it as your own because, after doing one myself, I now have great respect and admiration for those who offer written tutorials as stopping and starting to take photos, editing the photos by cropping/resizing and just writing the tute so it makes sense is quite a lot to do!!
I do think at least a mention of my blog, and possibly a link to the tute here if you feel so inclined, is not much to request :).
Cheers,
Robyn xo
Footnote: If anything is unclear in the tutorial, please message me.
No such luck unless it was a video. Now what beginner with not a lot of machine sewing experience wants to try and watch a video, some of which assumed the viewer knew sewing terms and a lot of basic skills, and sew something they've never made before at the same time? Add to that I have satellite internet and know quite a few others who share this "affliction" so 10 minute plus videos that don't have all the steps clearly layed out are a waste of precious expensive download.
That left me with one course of action - make my own tutorial.
So here it is for those of you who aren't already members of the DTE forums.
A Simple Denim Jeans Tote Bag
Basic Requirements
An old pair of jeans – whatever size you want your bag
An old fabric belt
Quick unpick – also known as seam ripper....just in case!
Scissors or rotary cutter and cutting board
Pins and pin cushion
Ruler, tape measure or sewing/quilting rulers /squares
Pencil or marking chalk
Sewing machine
Thread for machine.
Machine needles for denim size 90/14 or 100/16 depending how thick/heavy the denim is.
Iron – this can be made without the use of an iron but I find it easier to do so and a place to iron (ironing board, blanketed table etc)
Note: All side seams and hems are 1/2'” wide and I backstitch at beginning and end of each row of stitching to secure it.
.jpg)
Hoping you’ve already set up your machine to sew denim re stitch length etc .
First cut the jeans. You choose how big you want the bag to be but keep in mind that this will be a bag with boxed corners so allow extra for that. Mine are 18” square fabric pieces which will make a bag around 15”x 15” x 3” deep. I used size 16 (Australian measurement) ladies jeans . Cut one bottom section out of each jeans leg, leaving the inside leg seam intact. The thick outside seams are removed as they will be difficult to sew over. I unpicked the hand sewn leg hem as I needed that inch or so to do my new top seam.
.jpg)
.jpg)
.jpg)
.jpg)
Place the pieces right sides together and square them up, or you can make your own “ruler” from a big cereal box and use it.
.jpg)
.jpg)
.jpg)
.jpg)
Once they are squared clip a 1” long strip of fabric from the edge next to the existing seam. This will reduce fabric bulk when hemming.
.jpg)
.jpg)
.jpg)
.jpg)
Now place the outsides of your bag facing each other, pin them together, then sew. I like to sew each side from top to bottom first, then sew the bottom seam together. I find there’s less fabric movement that way than going down one side across the bottom and up the other side. As the denim tends to fray you may want to stabilise it by overlocking (serging), using zig-zag or edging stitch like I did, or clipping with pinking shears if you own a pair. I also clip the corners on a diagonal before the stabilising stitch to make the corners neater when they are turned right way out.
.jpg)
Ready to make a box bottom? Ok, your bag should still be inside out so align the bottom seam and the side seam and finger or iron press. There should be a point formed. Measure 3” up from this point where the stitches meet, and mark a line. Pin to secure then sew along the line. Do the same thing to the other corner. It’s optional whether you clip off these points about ½” from the seam or fold them to the inside as support and hold them in place with a few stitches like I do. This is where it’s handy to have a free arm on your machine.
.jpg)
To ensure your bottom thread doesn’t become tangled underneath turn the wheel on the side of your machine to take a stitch and when the needle returns pull the bobbin thread through the material to the top, just as you’d do if you’d just rethreaded the machine. This means both threads are now on top and you can hold them when you begin stitching.
.jpg)
Inside of box bottom
.jpg)

I purchased a belt for 20 cents at the op-shop to be my handles as I wanted short, strong, wide handles as this will be my bag for carrying cans, bags of sugar etc in when I shop. I removed the fastening and cut the end tab off then singed the partly acrylic raw edges so they won’t fray. No, I didn’t provide protection for the table but yes, I have done this before so I knew this one wouldn’t drip. I usually do it over the empty stainless steel kitchen sink for safety reasons.

When you have cut the handles to the size you require and sealed them, or secured the ends with stitching, measure 3” in from the side seams and make a mark. Pin the outside of your handle ends here and have 1” protruding past the bottom of the top hem as this is the area you will sew in to attach them.


Sew the handles on by stitching a square to secure them firmly. If you’re not familiar with this what you do is stitch almost to the edge of the handle, parallel to the hem, stop the machine with the needle still lowered in the fabric, raise the presser foot, turn the bag until it is in position to sew down the side of the handle, lower the presser foot and repeat.
.jpg)
Your finished bag should resemble this one.
Hope everyone has fun trying this!
Feel free to link or copy for your own use but don't claim it as your own because, after doing one myself, I now have great respect and admiration for those who offer written tutorials as stopping and starting to take photos, editing the photos by cropping/resizing and just writing the tute so it makes sense is quite a lot to do!!
I do think at least a mention of my blog, and possibly a link to the tute here if you feel so inclined, is not much to request :).
Cheers,
Robyn xo
Footnote: If anything is unclear in the tutorial, please message me.
Subscribe to:
Posts (Atom)